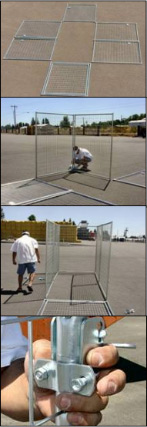
Modular Dog Kennel Assembly Instructions

Step 1 - SITE CHOICE AND GROUND PREPARATION
Locating a flat and level assembly area for your kennel will insure that your kennel is a safe home for your pet. Insure the site is clear of foreign objects and is protected from sun and other weather elements that may be harmful to your pet.
Step 2 - PANEL ASSEMBLY
Starting at the back of your kennel, have a friend hold up the panel while you bolt one side panel into place.
Note: The back and front panels will establish the width of your Kennel. The width of your kennel should be 58 inches.
Step 3 - INSTALLING GATE LATCH
Once you have determined if your gate will latch on the left or right side, bolt into place and install the latch. When installing your latch, ensure it is very tight so it does not turn on the frame.
Note: Adding a secondary safety chain can give you added confidence that your pet is safe at home while you are away.
Step 4 - EXTREMELY IMPORTANT!!!!
Pet/companions are very comfortable in the safety enclosure: however, it is suggested that there be a brief introduction period to acclimate your pet/companion. To begin this process, place your pet in the kennel for short periods of time (10-20 minutes) throughout the day while you are able to observe their behavior. If your pet begins to show signs of discomfort of nervousness (e.g., barking or whining) administer verbal correction from a distance. As the training continues, gradually increase the duration of stays inside the kennel until the pet has become completely comfortable with their new surroundings. Providing play things for your pet/companion will also comfort them. Also, insure that clean and adequate water and food is available at all times.
REMEMBER, verbal and physical affection will aid your pet/companion to be completely satisfied with their new safety enclosure.

